So two weekends ago, I took the bike out to give it a good run now that I'm no longer limited to 5,000 rpm. The motor continues to be very smooth compared to the Ninja 650R's parallel twin. It seems to pull a little harder, too, but that may also be due to being able to rev past 5,000 when accelerating from a stop. The transmission seems to be a little stiffer, requiring a little more "deliberate" action when upshifting. The Ninja 650R's transmission edges the V-Strom here as it was very easy to upshift, sometimes not even needing the slight tug I gave to the clutch lever.
Taking advantage of the new rev freedom, I decided to blast down the interstate towards my riding location of choice, which is about 30 miles away. It's nice to be able to keep up with traffic instead of concentrating on not being run down from behind. Keeping up also meant maintaining higher revs. As a result, the indicated mileage suffered accordingly, dropping from 59.2 mpg (US) to 47.2 mpg. Interestingly enough, my mind has already accepted the upper 50's as the norm and was somewhat disappointed with the resulting 47.2 mpg despite the fact that the Ninja 650R averaged only just above that in highway riding. Part of the decreased mileage might also be due to the fact that for a good portion of the ride, there was a significant headwind. I also can't help but think that the Givi topcase might also be adversely affecting the mileage.
So speaking of headwind -- I'm not quite sure at this point that raising the windshield had the desired effect I initially thought it had. When headed into the wind, I could feel some wind buffeting on the top 1/4 of my helmet. At times, it was bad enough that my vision was somewhat buzzy, which was only exacerbated by the fact that I wear glasses. I can duck my head a couple of inches, and all wind buffeting goes away, but this isn't a comfortable way to ride. I've been eyeballing the MRA X-screen, but Twisted Throttle wants just over $200 for it, so I've been hesitant in pulling the trigger. That is until I saw a listing on the Stromtrooper.com For Sale board for just that very windscreen for $115. So we'll see if that fixes the buffeting problem when I get it. I think there's a good chance it will, because it has the little spoiler/wing at the top that can be adjusted to redirect the air flow off the top of the screen further over my helmet. Hopefully, the side-to-side buffeting isn't a result of the redirected air flow from the hand guards in combination with the paddle-like rearview mirrors.
This highway ride brought the total mileage to 640, which meant that it was time for the V-Strom's first service. Now I know there are many of you out there who believe in doing your own wrenching, but I'm a firm believer that it's money well-spent to have someone with the proper tools and greater experience do work that I could just as easily screw up with greater consequences. So I called around and was quite surprised at the wide variance in prices quoted for the initial 600 mile service. I'm not going to go into the price, because that's just going to lead to comments like "you got ripped off" or "you need to learn to do this yourself". Suffice it to say that I was happy with the job the service guys did and the price wasn't too bad even with the upgrade to Amsoil synthetic. It took less than two hours for them to get to it and complete the service, so my bike was ready and waiting by the time my buddy Erik had come to get me for lunch and dropped me off afterwards.
Hopefully tomorrow will be nice and sunny, so I can enjoy another winter's day ride.
Showing posts with label E55. Show all posts
Showing posts with label E55. Show all posts
Friday, December 14, 2012
Wednesday, November 21, 2012
Connecting the Givi Maxia 3 Brake Lights with help from Eastern Beaver
The Givi Maxia 3 Luxury B top case came with the padded liner as well as the brake light kit pre-installed. There are some things that are commonly accepted regarding the Givi brake light kit:
Tools Used:
Now I had to install a connector housing on the auxiliary lead, which would be used to connect the Givi brake light. Interestingly enough, the male pins go in the female housing, and the female pins go in the male housing. To keep with the factory installation, I put a female housing on this lead, which meant that I had to install the male leads on the ends of the wires. After crimping on the leads, I inserted them into the housing so that they matched the factory configuration. The only difference is that I had to use the 6th pin for the red (brake light output) wire, where the factory plug only uses 5 pins.
I wanted to route the Givi brake light lead in such a fashion that it would remain stable and wouldn't have much of a chance of being snagged by anything. I removed the top cover of the mounting plate and wove the wire through one of the holes and back down so that it would take any strain from being tugged instead of the directly at the connector pod.
I then ran the cable across to the left side under the factory rack, wound it around the rack's left front mounting post, across to the rack's right mounting post, and then down the side of the rear panel to bring the cable inside the rear body panel via the hole for the exhaust's mounting point. Inside the tail section, I used a cable tie to secure the Givi brake light lead to the subframe.
With the lead inside the tail section, I could put the male connector on it. This required crimping the female pins to the lead wires. Again, since I had the Version 2 EB connector, I had to install the red jumper wire to connect the brake light input and output wires so that the motorcycle's tail light would work as well as the Givi brake lights. After inserting the pins into the housing, I plugged everything together, powered on the motorcycle, and tested everything to make sure all the lights were working, especially the brake lights on the motorcycle and the case. Everything checked out fine.
With all the lights verified as working correctly, I simply tucked the auxiliary lead underneath the crossbar in the under seat tray where the seat lock is mounted to keep it safe and out of the way.
The nice thing about going to this level of effort is that if I decide to install the Admore brake/turn/signal light upgrade on the Maxia 3, all I have to do is unplug the Givi lead, re-pin the male connector housing with the Admore lead, and plug it in. It's a $140 upgrade, so I'm not sure if I would do that or just install one of their light bars so that I have that extra visibility regardless of whether or not the top case is being used.
- The contacts in the case itself suck and result in intermittent contact, which in turn makes the brake lights sometimes work and sometimes not. So far, mine seem to be holding up well, but this may be a time will tell kind of issue.
- The wire taps provided to splice the brake lights into the bike's wiring harness suck.
- It's a pain to get to those wires, so you may as well splice it properly before putting it all back together.
- The Givi LEDs are somewhat hard to see during the day, but are quite visible at night.
So with all this in mind, I did more research on how best to connect the brake light when I came across Jim Davis' Eastern Beaver Power page, specifically the V-Strom products page. Apparently, all V-Stroms use a wiring harness for the brake, tail, and turn signal lights, which connect to the main electrical harness towards the rear of the subframe inside the left rear side panel. Jim makes a harness that will patch in at this connection, using the same type of plugs, and provides an auxiliary set of wires with which to control another set of lights, such as the Givi brake lights. I went with the Version 2 harness as it seemed the most flexible in case I want to install some different types of brake lights, and I also purchased additional plug housings so that I could have a clean factory-like installation instead of wire nuts or posi-taps. The plug housings are the Sumitomo 6-wire .090 HM-series connectors, or part number 6P090-HM on the Eastern Beaver site.
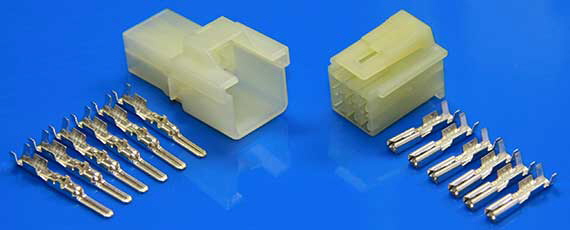 |
| 6P090-HM Connector |
- Wire Stripper/Cutter
- Crimping Tool
Time to Install: ~1 hour (I was taking my time with the wire stripping and crimping so as not to screw anything up.)
So the first thing I had to do was determine which way I needed to mount the contact lead for the Givi brake lights in the mounting plate. There are two contacts, but neither are marked. I installed the contact pod into the mounting plate with the wires coming out towards the front of the bike. Then I mounted the top case on the bike and connected the two wires to a 9V battery to see which combination of +/- would make the lights go on. As it turned out, the contact pod was installed such that the black wire was the ground (-) and the blue was the signal (+).
Now I took the Eastern Beaver (EB) harness and plugged it in-line with the factory wiring harness for the brake/tail/turn signal lights. Fortunately, it's very easy to separate the connectors by pressing down on the top of the male housing and pulling apart the plugs. The main harness (front of the bike) has the female connector, and the rear light harness has the male connector. With the EB harness in place, I turned on the power to the motorcycle in order to confirm that all the lights were working as expected. I had to cross-connect the purple and red wires, because the Version 2 EB harness has separate brake input and output wires to allow the installation of in-line brake light modulator units. If there isn't such a unit installed, then these two wires need to be connected so that the stock brake light still works.
 |
| Eastern Beaver Harness plugged into OEM Harness |
 |
| Plug Mounted on Auxiliary Lead |
 |
| Givi Brake Light Lead Under the Rack |
 |
| Givi Brake Light Lead Routed into Tail Section Through Exhaust Mount Hole |
 |
| Plug Mounted on Givi Brake Light Lead with Jumper |
 |
| EB Wiring Harness Tidied Up |
At any rate, I now have the added visibility of the Givi brake lights in the top case.
Thursday, November 15, 2012
Givi Maxia 3 Top Case and Mounting Plate
After installing the lower cowling (see previous post), I turned my attention towards mounting the Givi top case. I opted for the Maxia 3 Luxury B model, which boasts 55L of storage volume and includes the case liner and integrated brake lights. The best price I found was at Twisted Throttle for $359.10. I understand that there are performance issues surrounding the brake lights and connectors, but I would have only saved $25 had I purchased the base Maxia 3 and case liner separately. There are also options if I find that the brake light situation isn't serviceable, such as hardwiring the lights from the bottom case contacts or installing the Admore upgrade, which even adds running lights and turn signals to the case. I'm holding off on that option for now, since it's a $140 upgrade.
Removing the pad reveals the two bolts that hold on the luggage rack. Use the 13mm socket to remove these bolts. You can put these aside as they will not be re-used.
In the picture below, you can see the adapter plate as mounted to the SR3101 mounting plate. The SR3101 plate has four (4) studs to which the adapter plate connects, using the four square shaped washers and provided nylock nuts to hold it in place. You will use the same 10mm socket to tighten the nuts. As you can see, I mounted the plate one square forward of the rearmost position, and then I slid the plate as far back as the washers would allow.
After that, it's a simple matter of snapping the cover on and fixing it in place using the four (4) provided screws. These screws are tiny, so make sure you don't lose them when you open the bag. Do not screw them in too tight either, as they can easily strip the holes.
Tools Used:
- Rubber Mallet
- Socket Extension
- X-acto Modeling Knife
- Socket: 10mm, 13mm
- Hex Driver: 5mm
- Ratchet
- Philips Head Screw Driver
Time to Install: ~1 hour thanks to having to find some missing tools.
So to start off, I had to remove the blank from the adapter plate to open the hole where the contact for the power supply mounts. It was pretty simple to do using a rubber mallet and the extension from my socket set. I put the 3/8" square driver end on the plate, and struck the socket end with the mallet. After about 5 good hits, the blank broke off. I then cleaned up the hole using an X-acto modeling knife.
 |
| View from Bottom of Plate |
 |
| View from Top of Plate |
 |
| Socket Extension and Mallet |
The next step is to install the Givi mounting plate. This is the SR3101 plate for mounting Monokey boxes to the 2012 DL650A V-Strom. First, you remove the OEM rubber cover from the rack. There are five (5) "plugs" on the bottom of the pad that are simply press-fit to hold the cover on.
 |
| Rubber Pad Removed |
 |
| Mounting Bolts at Top |
The mounting plate comes with two metal spacers that will go into the holes where the original mounting bolts were. Be careful and check the spacers. One of mine still a metal shaving attached from when the holes were bored out, and the spiral shaving was very sharp. I used one of the bolts to push it through.
 |
| Spacer (L), Metal Shaving (R) |
 |
| Spacers in the Luggage Rack Holes |
With the spacers in place, you put the SR3101 mounting plate on the rack, and attach it using the 5mm hex driver to drive the supplied bolts. The two longer bolts go where the original luggage rack bolts were (towards the front of the bike), and the two shorter bolts go in the holes towards the rear of the bike and secure with the included nylock nuts. You will need the 13mm socket to hold the nut. Unfortunately, I forgot to take a picture of the plate mounted by itself, but you'll be able to see it in one of the next pictures. So with the mounting plate installed, it's time to install the adapter plate to which the top case actually mounts. I wasn't sure how far back I wanted to install it, so I put the case on it and dry-fitted it first. I started with it all the way to the rear, but it looked a bit odd to me, so I moved it one square forward, and it seemed a little better. I may have to move it back if my wife decides she wants to ride with me, because the case might be a little too far forward in that case. Moving it back would give about another 1-1/2" of room.
 |
| Test Fitting the Adapter Plate and Case |
 |
| Adapter Plate Mounted to the SR3101 Mounting Plate |
 |
| Mounting Plate/Adapter Fully Installed Note the hole for the power connector. |
 |
| Side View |
 |
| With Case Mounted |
I just received the brake/tail/signal wiring harness that I ordered from Eastern Beaver. This will allow me to simply unplug the rear brake/tail/signal light harness, insert this adapter harness, and then use the open lead to wire in the Givi brake lights. I bought additional plug housings so that everything is a plug-in connection, which will be a lot cleaner than positaps or splicing. If I do decide to get the Admore kit, I can just unplug the Givi lead, and then install a plug on the Admore harness and plug it right in. That and installing the OEM hand guards will probably be this weekend's project.
Subscribe to:
Posts (Atom)