Showing posts with label Givi. Show all posts

Wednesday, December 4, 2013

Underwear for the V-Strom

Rev. Brian posted a comment on my previous posting "Summer, Seats, and Stelvio" and included that he was trying to decide between getting the OEM under cowling or a real skid plate.  I started writing a reply and then figured it would make a good posting, since it's been a while since I've added anything to the blog.  This, of course, then reminded me that I never made a post after attending the International Motorcycle Show in Dallas, TX last month, so that's something else to add.  Look for that soon.

Anyway, back to Rev. Brian's conundrum.  Before I go any further, I want to make it clear that the following is merely my opinion based on my experience and observations, be they correct or wildly not.  Much of it is supposition, because I have direct experience only with the OEM under cowling.  If you have better information from which Rev. Brian can benefit, then please leave a comment.  Flames or trolling will be deleted with extreme prejudice.  It is my blog, after all.  :-)

So for those of you who have not read his comment, Rev. Brian is planning an adventure to the Black Hills in June and is trying to decide what kind of underwear to buy his V-Strom.  My advice is to take a good hard look at the type of riding that you intend to do, and then purchase the appropriate item to meet that use case.

For me, very little, if any, of my riding is going to be off-road.  If I do go off-road, it will most likely be limited to fire roads or groomed gravel.  Certainly nothing requiring a 4x4 vehicle, so the risk of high-centering (maxing out the bike's clearance) or sliding over rocks/logs and needing to protect the exhaust pipe or engine casing is practically zero.  In my use case, the OEM under cowling should be adequate protection from any road debris that might get kicked up and threaten the oil filter and/or exhaust pipe.


Seeing as how Rev. B is going to be visiting the Black Hills, I would hazard a guess that he may see some off-road action during his trip.  Even so, the OEM under cowling may be adequate if sticking to roads such as those I described above.

Givi makes a belly pan that I think offers a level of protection between the OEM under cowling and a skid plate.  It's also quite cost effective at $160.99 from OneidaSuzuki.com.


It appears to be a light-weight aluminum belly pan that I think can be mounted without engine guards/crash bars.  It seems like it would provide a bit more off-road protection than the OEM under cowling, but not quite as much as a skid plate.  Having not seen one in person, I can't really comment on just how durable it is.  From posts on Stromtrooper.com, it seems to be fairly durable in light off-road duty.  I still think the OEM under cowling looks better on the V-Strom, but this option might look better with a coat of matte black paint or spray-on rubberized truck bed liner.

Another option that doesn't require engine guards/crash bars is the SW-Motech skid plate, which is available at TwistedThrottle.com for $259.99.


Some posts I have read showed concern for the fact that it attaches directly to the engine case and may potentially cause greater damage than the protection it provides.  I believe that the concept is that the mounting struts are designed to flex in the event of an impact, absorbing some of the energy.  This is SW-Motech's bread and butter, so I'd like to think that they thought this through and did some testing to make sure that impacts to the skid plate would not bust up the engine case.  Maybe I'm just too optimistic.

There are other skid plate options as well -- Hepco & Becker, AltRider, and many more that can be found on Stromtrooper.com -- that require engine guards/crash bars to be installed.  These are probably the strongest solutions, but I guess it all boils down to how the skid plate connects to the crash bars.  It would be interesting to see some crash testing done to find out how each solution performs and up to what impact levels.  The skid plates alone are probably on par with the SW-Motech, but then you have to factor in the cost of the engine guards/crash bars if you don't already have any.

So I guess to summarize, I would rank these as follows:
  • On-Road Only -- OEM under cowling is definitely adequate; expensive but looks great
  • Light Off-Road -- OEM under cowling is probably adequate; the Givi belly pan would be better, less expensive, but not as factory-looking
  • Light to Medium Off-Road -- Givi belly pan on the lighter end; SW-Motech on the medium end; both have that after-market add-on look
  • Serious Off-Road -- skid plate incorporated with engine guards/crash bars; after-market add-on or bad-ass adventure look, your choice
Remember, this is just my opinion based on what I've read and what I think about a product based on its manufacturer's description.  Rev. Brian, I hope you found this to be somewhat helpful in making your decision on what to get.

Saturday, February 2, 2013

Windshields, iPods/iPhones, Wheel Stripes, and POV Cams

Of windshields...

Just a quick update to share some additional thoughts on the X-creen now that I've had a chance to go on two extended rides with it installed.  The two rides I've been on since installing the X-creen were both over 100 miles each, and I have to say that I'm very please with it still.  I've tweaked the wing angle just a tiny bit, but for the most part it's where I had it positioned after my initial test rides.  I no longer feel the side-to-side buffeting that I used to, and it seems that the wind roar is a bit less than with the stock shield, too.  I can still duck down a little bit and notice some change in the amount of wind roar, but nothing like before.  I think it would be nice if the X-creen had some standoffs like the stocker's to raise the angle of the primary shield a bit more.  One bit of concern to me is that the X-creen does seem to flex quite a bit in the wind at highway speeds.  I haven't seen any cracks or anything yet, so I'm assuming that it's performing as designed.  I'll just keep an eye on it as time goes by.  On the whole, though, I'm very pleased with it and will keep it installed in favor of the stock windshield.

I have to admit that I'm still curious as to how well the Givi AirFlow AF3101 windshield works in comparison, but at $200+ it's not a curiosity I can see satisfying any time soon, especially considering how well I think the X-creen is working.

I'm also curious about the Saeng Micro-swirl edging, and at only $12.50/foot, I can even justify buying it even if I ultimately don't use it.  I'm wondering if a combination of this edging and the X-creen might be an even better solution.  Stay tuned as I may well place an order.

Of iPods and iPhones...

When I ride long distances, I usually wear ear plugs, but sometimes I want to listen to music instead of my own random thoughts or humming.  Yes, I actually hum to myself and even perform private karaoke while motoring down the road.  When I delegate the music performance to my digital stable of better-talented MP3s, I've been depending on my trusty old 4th Generation iPod Photo 30GB.  Unfortunately, I've noticed lately that the battery only lasts about 2.5 hours, forcing me to take up the slack again and go back to humming and karaoke.

I've looked into eBay and purchasing an after-market replacement battery to prolong its useful life as well as simply replacing it with the current 160GB iPod Classic.  The replacement battery is a much cheaper solution than the 160GB iPod Classic, but 160GB will just about hold my entire library.  I then realized that I still have my perfectly functioning 32GB iPhone 3GS sitting idly in my drawer resulting from my 4S upgrade, and it is perfectly capable of providing music and more.  So on this last ride, I loaded it up with some Pink Floyd and the MotionX GPS app.  Even though it may not be quite as accurate without cellular data, the GPS still worked quite well.

The MotionX GPS app is nice in that while cruising along, it will give me audible updates every 10 minutes, telling me how long I've been riding, how far I've gone, and what my current speed is.  The current speed information was a little bit sketchy, considering it's GPS-based, and often wasn't even close to my actual speed if I had sped up or slowed down significantly prior to the update.  If I had traveling fairly steady, then my indicated speed was approximately 4mph higher than my GPS-reported speed, which is also good to know.  At the end of the ride, it shows my track on a map, which I can then share or store for future reference.  The app also has the ability to send regular updates to people via email, FaceBook or Twitter.  I haven't tried this feature yet, but I will.

With the music running along with the GPS app, I had about 45% of the battery life available at the end of my 2h 45m ride.  This means I would get approximately 5 hours of total battery life, which isn't too shabby.  For a multi-day truly long-distance trip, I can see where an extended battery pack or tying into the bike's electrical system would be warranted.  I would eventually want to get a weatherproof case for the iPhone and a RAM mount so I could actually see the controls (or even use MotionX GPS Drive) instead of just leaving it in my jacket pocket, but that's not really a necessity for me right now.

Of Wheel Stripes...

I finally received my order of orange reflective wheel stripes from the good folks at GLSigns.com, but I haven't had a chance to install them yet.  The orange isn't a perfect match, and it's even arguable that it's close.  In the shade, you would say it's close, but I need to pull the bike out in bright sunlight and do a comparison just to see if it's so different that it would annoy me.  I figure my fallback position would be to order some black reflective stripes that reflect silver.  The primary goal is to increase my night time visibility to other drivers.  The secondary goal is aesthetic.  I was lucky with my Ninja 650R in that the deep red stripes matched the red frame almost perfectly.  I may look at this in the morning.  Check back later for an update.

That's it for this update.  I hope you learned something or at least enjoyed the read.  The next post will probably be about my POV camera's woes and their hopefully pleasant resolution.

Friday, December 14, 2012

Riding and Service

So two weekends ago, I took the bike out to give it a good run now that I'm no longer limited to 5,000 rpm.  The motor continues to be very smooth compared to the Ninja 650R's parallel twin.  It seems to pull a little harder, too, but that may also be due to being able to rev past 5,000 when accelerating from a stop.  The transmission seems to be a little stiffer, requiring a little more "deliberate" action when upshifting.  The Ninja 650R's transmission edges the V-Strom here as it was very easy to upshift, sometimes not even needing the slight tug I gave to the clutch lever.

Taking advantage of the new rev freedom, I decided to blast down the interstate towards my riding location of choice, which is about 30 miles away.  It's nice to be able to keep up with traffic instead of concentrating on not being run down from behind.  Keeping up also meant maintaining higher revs.  As a result, the indicated mileage suffered accordingly, dropping from 59.2 mpg (US) to 47.2 mpg.  Interestingly enough, my mind has already accepted the upper 50's as the norm and was somewhat disappointed with the resulting 47.2 mpg despite the fact that the Ninja 650R averaged only just above that in highway riding.  Part of the decreased mileage might also be due to the fact that for a good portion of the ride, there was a significant headwind.  I also can't help but think that the Givi topcase might also be adversely affecting the mileage.

So speaking of headwind -- I'm not quite sure at this point that raising the windshield had the desired effect I initially thought it had.  When headed into the wind, I could feel some wind buffeting on the top 1/4 of my helmet.  At times, it was bad enough that my vision was somewhat buzzy, which was only exacerbated by the fact that I wear glasses.  I can duck my head a couple of inches, and all wind buffeting goes away, but this isn't a comfortable way to ride.  I've been eyeballing the MRA X-screen, but Twisted Throttle wants just over $200 for it, so I've been hesitant in pulling the trigger.  That is until I saw a listing on the Stromtrooper.com For Sale board for just that very windscreen for $115.  So we'll see if that fixes the buffeting problem when I get it.  I think there's a good chance it will, because it has the little spoiler/wing at the top that can be adjusted to redirect the air flow off the top of the screen further over my helmet.  Hopefully, the side-to-side buffeting isn't a result of the redirected air flow from the hand guards in combination with the paddle-like rearview mirrors.

This highway ride brought the total mileage to 640, which meant that it was time for the V-Strom's first service.  Now I know there are many of you out there who believe in doing your own wrenching, but I'm a firm believer that it's money well-spent to have someone with the proper tools and greater experience do work that I could just as easily screw up with greater consequences.  So I called around and was quite surprised at the wide variance in prices quoted for the initial 600 mile service.  I'm not going to go into the price, because that's just going to lead to comments like "you got ripped off" or "you need to learn to do this yourself".  Suffice it to say that I was happy with the job the service guys did and the price wasn't too bad even with the upgrade to Amsoil synthetic.  It took less than two hours for them to get to it and complete the service, so my bike was ready and waiting by the time my buddy Erik had come to get me for lunch and dropped me off afterwards.

Hopefully tomorrow will be nice and sunny, so I can enjoy another winter's day ride.


Wednesday, November 21, 2012

Connecting the Givi Maxia 3 Brake Lights with help from Eastern Beaver

The Givi Maxia 3 Luxury B top case came with the padded liner as well as the brake light kit pre-installed.  There are some things that are commonly accepted regarding the Givi brake light kit:

  1. The contacts in the case itself suck and result in intermittent contact, which in turn makes the brake lights sometimes work and sometimes not.  So far, mine seem to be holding up well, but this may be a time will tell kind of issue.
  2. The wire taps provided to splice the brake lights into the bike's wiring harness suck.
  3. It's a pain to get to those wires, so you may as well splice it properly before putting it all back together.
  4. The Givi LEDs are somewhat hard to see during the day, but are quite visible at night.
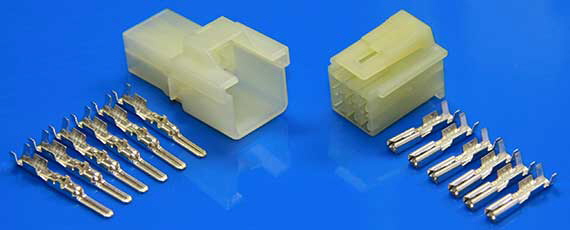
So with all this in mind, I did more research on how best to connect the brake light when I came across Jim Davis' Eastern Beaver Power page, specifically the V-Strom products page.  Apparently, all V-Stroms use a wiring harness for the brake, tail, and turn signal lights, which connect to the main electrical harness towards the rear of the subframe inside the left rear side panel.  Jim makes a harness that will patch in at this connection, using the same type of plugs, and provides an auxiliary set of wires with which to control another set of lights, such as the Givi brake lights.  I went with the Version 2 harness as it seemed the most flexible in case I want to install some different types of brake lights, and I also purchased additional plug housings so that I could have a clean factory-like installation instead of wire nuts or posi-taps.  The plug housings are the Sumitomo 6-wire .090 HM-series connectors, or part number 6P090-HM on the Eastern Beaver site.

6P090-HM Connector
Tools Used:
  • Wire Stripper/Cutter
  • Crimping Tool
Time to Install:  ~1 hour (I was taking my time with the wire stripping and crimping so as not to screw anything up.)

So the first thing I had to do was determine which way I needed to mount the contact lead for the Givi brake lights in the mounting plate.  There are two contacts, but neither are marked.  I installed the contact pod into the mounting plate with the wires coming out towards the front of the bike.  Then I mounted the top case on the bike and connected the two wires to a 9V battery to see which combination of +/- would make the lights go on.  As it turned out, the contact pod was installed such that the black wire was the ground (-) and the blue was the signal (+).

Now I took the Eastern Beaver (EB) harness and plugged it in-line with the factory wiring harness for the brake/tail/turn signal lights.  Fortunately, it's very easy to separate the connectors by pressing down on the top of the male housing and pulling apart the plugs.  The main harness (front of the bike) has the female connector, and the rear light harness has the male connector.  With the EB harness in place, I turned on the power to the motorcycle in order to confirm that all the lights were working as expected.  I had to cross-connect the purple and red wires, because the Version 2 EB harness has separate brake input and output wires to allow the installation of in-line brake light modulator units.  If there isn't such a unit installed, then these two wires need to be connected so that the stock brake light still works.

Eastern Beaver Harness plugged into OEM Harness
Now I had to install a connector housing on the auxiliary lead, which would be used to connect the Givi brake light.  Interestingly enough, the male pins go in the female housing, and the female pins go in the male housing.  To keep with the factory installation, I put a female housing on this lead, which meant that I had to install the male leads on the ends of the wires.  After crimping on the leads, I inserted them into the housing so that they matched the factory configuration.  The only difference is that I had to use the 6th pin for the red (brake light output) wire, where the factory plug only uses 5 pins.

Plug Mounted on Auxiliary Lead
I wanted to route the Givi brake light lead in such a fashion that it would remain stable and wouldn't have much of a chance of being snagged by anything.  I removed the top cover of the mounting plate and wove the wire through one of the holes and back down so that it would take any strain from being tugged instead of the directly at the connector pod.

Givi Brake Light Lead Under the Rack
I then ran the cable across to the left side under the factory rack, wound it around the rack's left front mounting post, across to the rack's right mounting post, and then down the side of the rear panel to bring the cable inside the rear body panel via the hole for the exhaust's mounting point.  Inside the tail section, I used a cable tie to secure the Givi brake light lead to the subframe.

Givi Brake Light Lead Routed into Tail Section
Through Exhaust Mount Hole
With the lead inside the tail section, I could put the male connector on it.  This required crimping the female pins to the lead wires.  Again, since I had the Version 2 EB connector, I had to install the red jumper wire to connect the brake light input and output wires so that the motorcycle's tail light would work as well as the Givi brake lights.  After inserting the pins into the housing, I plugged everything together, powered on the motorcycle, and tested everything to make sure all the lights were working, especially the brake lights on the motorcycle and the case.  Everything checked out fine.

Plug Mounted on Givi Brake Light Lead with Jumper
With all the lights verified as working correctly, I simply tucked the auxiliary lead underneath the crossbar in the under seat tray where the seat lock is mounted to keep it safe and out of the way.

EB Wiring Harness Tidied Up
The nice thing about going to this level of effort is that if I decide to install the Admore brake/turn/signal light upgrade on the Maxia 3, all I have to do is unplug the Givi lead, re-pin the male connector housing with the Admore lead, and plug it in.  It's a $140 upgrade, so I'm not sure if I would do that or just install one of their light bars so that I have that extra visibility regardless of whether or not the top case is being used.

At any rate, I now have the added visibility of the Givi brake lights in the top case.

Thursday, November 15, 2012

Givi Maxia 3 Top Case and Mounting Plate

After installing the lower cowling (see previous post), I turned my attention towards mounting the Givi top case.  I opted for the Maxia 3 Luxury B model, which boasts 55L of storage volume and includes the case liner and integrated brake lights.  The best price I found was at Twisted Throttle for $359.10.  I understand that there are performance issues surrounding the brake lights and connectors, but I would have only saved $25 had I purchased the base Maxia 3 and case liner separately.  There are also options if I find that the brake light situation isn't serviceable, such as hardwiring the lights from the bottom case contacts or installing the Admore upgrade, which even adds running lights and turn signals to the case.  I'm holding off on that option for now, since it's a $140 upgrade.

Tools Used:
  • Rubber Mallet
  • Socket Extension
  • X-acto Modeling Knife
  • Socket: 10mm, 13mm
  • Hex Driver: 5mm
  • Ratchet
  • Philips Head Screw Driver
Time to Install:  ~1 hour thanks to having to find some missing tools.

So to start off, I had to remove the blank from the adapter plate to open the hole where the contact for the power supply mounts.  It was pretty simple to do using a rubber mallet and the extension from my socket set.  I put the 3/8" square driver end on the plate, and struck the socket end with the mallet.  After about 5 good hits, the blank broke off.  I then cleaned up the hole using an X-acto modeling knife.

View from Bottom of Plate 
View from Top of Plate 
Socket Extension and Mallet
The next step is to install the Givi mounting plate.  This is the SR3101 plate for mounting Monokey boxes to the 2012 DL650A V-Strom.  First, you remove the OEM rubber cover from the rack.  There are five (5) "plugs" on the bottom of the pad that are simply press-fit to hold the cover on.

Rubber Pad Removed
Removing the pad reveals the two bolts that hold on the luggage rack.  Use the 13mm socket to remove these bolts.  You can put these aside as they will not be re-used.
Mounting Bolts at Top
The mounting plate comes with two metal spacers that will go into the holes where the original mounting bolts were.  Be careful and check the spacers.  One of mine still a metal shaving attached from when the holes were bored out, and the spiral shaving was very sharp.  I used one of the bolts to push it through.
Spacer (L), Metal Shaving (R) 
Spacers in the Luggage Rack Holes
With the spacers in place, you put the SR3101 mounting plate on the rack, and attach it using the 5mm hex driver to drive the supplied bolts.  The two longer bolts go where the original luggage rack bolts were (towards the front of the bike), and the two shorter bolts go in the holes towards the rear of the bike and secure with the included nylock nuts.  You will need the 13mm socket to hold the nut.  Unfortunately, I forgot to take a picture of the plate mounted by itself, but you'll be able to see it in one of the next pictures.  So with the mounting plate installed, it's time to install the adapter plate to which the top case actually mounts.  I wasn't sure how far back I wanted to install it, so I put the case on it and dry-fitted it first.  I started with it all the way to the rear, but it looked a bit odd to me, so I moved it one square forward, and it seemed a little better.  I may have to move it back if my wife decides she wants to ride with me, because the case might be a little too far forward in that case.  Moving it back would give about another 1-1/2" of room.

Test Fitting the Adapter Plate and Case
In the picture below, you can see the adapter plate as mounted to the SR3101 mounting plate.  The SR3101 plate has four (4) studs to which the adapter plate connects, using the four square shaped washers and provided nylock nuts to hold it in place.  You will use the same 10mm socket to tighten the nuts.  As you can see, I mounted the plate one square forward of the rearmost position, and then I slid the plate as far back as the washers would allow.

Adapter Plate Mounted to the SR3101 Mounting Plate
After that, it's a simple matter of snapping the cover on and fixing it in place using the four (4) provided screws.  These screws are tiny, so make sure you don't lose them when you open the bag.  Do not screw them in too tight either, as they can easily strip the holes.

Mounting Plate/Adapter Fully Installed
Note the hole for the power connector. 
Side View 
With Case Mounted
I just received the brake/tail/signal wiring harness that I ordered from Eastern Beaver.  This will allow me to simply unplug the rear brake/tail/signal light harness, insert this adapter harness, and then use the open lead to wire in the Givi brake lights.  I bought additional plug housings so that everything is a plug-in connection, which will be a lot cleaner than positaps or splicing.  If I do decide to get the Admore kit, I can just unplug the Givi lead, and then install a plug on the Admore harness and plug it right in.  That and installing the OEM hand guards will probably be this weekend's project.

Thursday, November 1, 2012

Why We're Now Here

My first motorcycle was a Galaxy Silver 2006 Kawasaki Ninja 650R that I bought used off of eBay with only 529 miles on the clock.  I rode it off and on (more off than on unfortunately) over the next six years at which time I came to the conclusion that I needed a bike with a little more legroom.  I'll save you the whole back-story and just skip to the chase.  In October 2012, I traded in the Ninja for a brand spanking new Metallic Fox Orange 2012 Suzuki V-Strom 650A.  I need to give a shout out to Michael Murphy and Steven Hill at Team Mancuso PowerSports North for making me a very good deal on both the new bike and my trade-in.  Thanks guys!  The primary point of this blog is for me to maintain a record of what I've done on this bike in case I need to repair, reinstall, or remove any accessories.  The secondary point is to share my experience with others in the hopes that it helps them as well.

One benefit of having owned the Ninja 650R is that I had a good idea of what accessories I wanted to add to the V-Strom, whereas it was a good four years until I added anything to the Ninja.  First and foremost, I wanted some crash protection.  It's a motorcycle, and it's a matter of "when" it's going to take a dirt nap not "if".  Then, I wanted some basic protection for the hands and the oil filter, which seems to be a bit exposed down in the front of the engine.  Finally, I wanted to get a top case in which I could lock my belongings instead of dragging them along with me when I stop.  It also had to be large enough to accommodate my wife's modular helmet should she decide to ride pillion.  That's it.  Pretty simple.

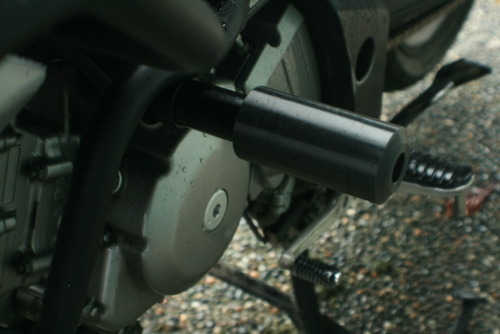
For the crash protection, I looked at engine crash bars and frame sliders.  After a lot of searching on www.stromtrooper.com, I decided to go with frame sliders by themselves as they seem to be up to the task.  I found a couple of stories by Stromtroopers who unfortunately field tested their sliders, but they took the brunt of the damage, leaving the bike virtually untouched.  That was good enough for me since I pretty much fit Suzuki's target demographic rider and do not really intend to take this bike off-road on anything more than a dirt/fire road.  After exchanging a few emails with Blair Layton at SVRacingParts.com, I ordered a combo set of frame and swing arm sliders, which arrived today only two days later.  While I have yet to install these puppies, I can say that Blair has been fantastic to deal with and VERY responsive to my emails.  The parts look very well-designed and every bit as sturdy as my R&G Racing setup was for the Ninja but at a fraction of the cost of R&G sliders for the V-Strom.  I'll post an update when I have a chance to install these.  Hopefully I'll be able to get to this tomorrow evening so they're installed for a ride I plan to do on Friday to burn off some more of those pesky sub-5000rpm break-in miles.

For the hands and oil filter protection, I found the best prices for OEM Suzuki accessories online at Oneida Suzuki.  I decided to go with the OEM hand guards since I'm mainly wanting to give my hands some protection from the wind when it gets colder than my vented leather gloves can handle.  I don't need them to be able to withstand going through trees at 30 mph, just the wind and occasional rock thrown up from the road or errant bug.  To protect the lower part of the engine, I went with the OEM under cowling.  While it's plastic and does not fully cover the bottom, I'm not going to be sliding over rocks and logs either.  Besides, I really like the look of the OEM under cowling, and it provides the level of protection I seek.  While I was at it, I went ahead and ordered a tank pad to protect the tank from scratches.  So another shout out, but this time to the good folks at Oneida Suzuki who are located in Oneida, NY near Syracuse, which was pretty much directly in the path of Hurricane Sandy.  I placed the order on Tuesday, and today I got emails saying my stuff has been shipped and should arrive a week from today.

Finally, the top case.  I knew I didn't want any of the aluminum box-type cases, because they just look too industrial to me, and they ruin the 2012 V-Strom's flowing lines.  I considered the Givi Trekker series, but unless you get the three-bag set with top and side cases, the top case looks like someone took an ice chest and just strapped it to the back.  That did nothing for me.  So I followed my friend Erik's lead and purchased a Givi Maxia 3 Luxury Edition B case and appropriate mounting plate from TwistedThrottle.com.  I looked all over, and TwistedThrottle.com had the best price for Givi products that I could find.  They also only had one of these left, so I clicked "Add to Cart" and checked out.  I should have this on Friday.

As far as I know, that should do it accessory-wise for the time being.  I will post pics as I get things installed so that if you are considering purchasing any of the above items, you'll have a fairly good idea of what's involved with the installation.  I hope to get in a bit more riding than I have in the past and maybe even post ride reports here, too.  Feel free to leave comments.  In the mean time, keep the rubber side down!

DISCLAIMER:  This blog is purely for information sharing purposes.  Anything you do to your bike is at your sole discretion, and I cannot be held responsible for any badness that may occur while attempting any of these activities.