The Givi Maxia 3 Luxury B top case came with the padded liner as well as the brake light kit pre-installed. There are some things that are commonly accepted regarding the Givi brake light kit:
- The contacts in the case itself suck and result in intermittent contact, which in turn makes the brake lights sometimes work and sometimes not. So far, mine seem to be holding up well, but this may be a time will tell kind of issue.
- The wire taps provided to splice the brake lights into the bike's wiring harness suck.
- It's a pain to get to those wires, so you may as well splice it properly before putting it all back together.
- The Givi LEDs are somewhat hard to see during the day, but are quite visible at night.
So with all this in mind, I did more research on how best to connect the brake light when I came across Jim Davis'
Eastern Beaver Power page, specifically the V-Strom products page. Apparently, all V-Stroms use a wiring harness for the brake, tail, and turn signal lights, which connect to the main electrical harness towards the rear of the subframe inside the left rear side panel. Jim makes a harness that will patch in at this connection, using the same type of plugs, and provides an auxiliary set of wires with which to control another set of lights, such as the Givi brake lights. I went with the Version 2 harness as it seemed the most flexible in case I want to install some different types of brake lights, and I also purchased additional plug housings so that I could have a clean factory-like installation instead of wire nuts or posi-taps. The plug housings are the Sumitomo 6-wire .090 HM-series connectors, or part number
6P090-HM on the Eastern Beaver site.
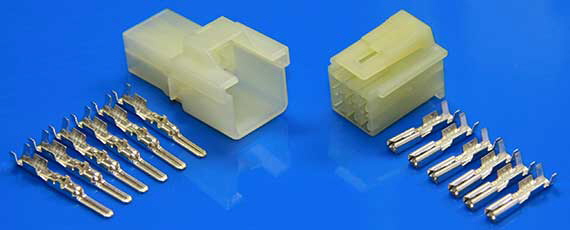 |
| 6P090-HM Connector |
Tools Used:
- Wire Stripper/Cutter
- Crimping Tool
Time to Install: ~1 hour (I was taking my time with the wire stripping and crimping so as not to screw anything up.)
So the first thing I had to do was determine which way I needed to mount the contact lead for the Givi brake lights in the mounting plate. There are two contacts, but neither are marked. I installed the contact pod into the mounting plate with the wires coming out towards the front of the bike. Then I mounted the top case on the bike and connected the two wires to a 9V battery to see which combination of +/- would make the lights go on. As it turned out, the contact pod was installed such that the black wire was the ground (-) and the blue was the signal (+).
Now I took the Eastern Beaver (EB) harness and plugged it in-line with the factory wiring harness for the brake/tail/turn signal lights. Fortunately, it's very easy to separate the connectors by pressing down on the top of the male housing and pulling apart the plugs. The main harness (front of the bike) has the female connector, and the rear light harness has the male connector. With the EB harness in place, I turned on the power to the motorcycle in order to confirm that all the lights were working as expected. I had to cross-connect the purple and red wires, because the Version 2 EB harness has separate brake input and output wires to allow the installation of in-line brake light modulator units. If there isn't such a unit installed, then these two wires need to be connected so that the stock brake light still works.
 |
| Eastern Beaver Harness plugged into OEM Harness |
Now I had to install a connector housing on the auxiliary lead, which would be used to connect the Givi brake light. Interestingly enough, the male pins go in the female housing, and the female pins go in the male housing. To keep with the factory installation, I put a female housing on this lead, which meant that I had to install the male leads on the ends of the wires. After crimping on the leads, I inserted them into the housing so that they matched the factory configuration. The only difference is that I had to use the 6th pin for the red (brake light output) wire, where the factory plug only uses 5 pins.
 |
| Plug Mounted on Auxiliary Lead |
I wanted to route the Givi brake light lead in such a fashion that it would remain stable and wouldn't have much of a chance of being snagged by anything. I removed the top cover of the mounting plate and wove the wire through one of the holes and back down so that it would take any strain from being tugged instead of the directly at the connector pod.
 |
| Givi Brake Light Lead Under the Rack |
I then ran the cable across to the left side under the factory rack, wound it around the rack's left front mounting post, across to the rack's right mounting post, and then down the side of the rear panel to bring the cable inside the rear body panel via the hole for the exhaust's mounting point. Inside the tail section, I used a cable tie to secure the Givi brake light lead to the subframe.
 |
Givi Brake Light Lead Routed into Tail Section
Through Exhaust Mount Hole |
With the lead inside the tail section, I could put the male connector on it. This required crimping the female pins to the lead wires. Again, since I had the Version 2 EB connector, I had to install the red jumper wire to connect the brake light input and output wires so that the motorcycle's tail light would work as well as the Givi brake lights. After inserting the pins into the housing, I plugged everything together, powered on the motorcycle, and tested everything to make sure all the lights were working, especially the brake lights on the motorcycle and the case. Everything checked out fine.
 |
| Plug Mounted on Givi Brake Light Lead with Jumper |
With all the lights verified as working correctly, I simply tucked the auxiliary lead underneath the crossbar in the under seat tray where the seat lock is mounted to keep it safe and out of the way.
 |
| EB Wiring Harness Tidied Up |
The nice thing about going to this level of effort is that if I decide to install the
Admore brake/turn/signal light upgrade on the Maxia 3, all I have to do is unplug the Givi lead, re-pin the male connector housing with the Admore lead, and plug it in. It's a $140 upgrade, so I'm not sure if I would do that or just install one of their light bars so that I have that extra visibility regardless of whether or not the top case is being used.
At any rate, I now have the added visibility of the Givi brake lights in the top case.


Hey, Marius -- yes, that is exactly what the connectors are. I included a link to the the connectors page on the Eastern Beaver site just above the first picture of the connector itself. With these connectors, it's a direct plug-and-play fit.
ReplyDeleteIf you have any doubts as to what you need, ask Jim. He's very responsive and will get you what you need.
ReplyDelete